Wednesday, 30 January 2013
Texturing Updates
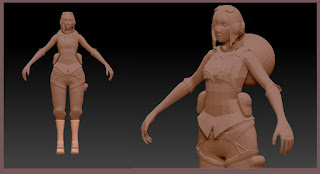
Updates just before bed, the diffuse is almost there, most of tomorrow will prob be trying to get rid of seams and stretching errors and I'll also do a specular tomorrow. I'm not too tired at the minute and so I might try and refresh my memory on how to rig.
Ammendments
Okay so after receiving some constructive critique from Mikey & Chris about the stylized proportions of the character I spend the morning tweaking the mesh to make it more realistic. I see where they are coming from in terms of i need to be consistent with the style to make it work. I love TF2 below are some of their characters and you see they are stylizes the same but in different wants. they all have tapering feet, their arms and forearms are larger, the skeleton is more torso heavy for the most part of them. But they still look in proportion to themselves.
Right so I got some reference pictures up and started to amend the mesh a bit, i put the flat diffuse on as well so it's easier to tell what part is what. I shortened the whole character, areas like the legs and boot were too long. The arms obviously were too big so i decreased them. The average is 7 and a half heads tall, i made her 8 because she was becoming stumpy and it seems to work okay. The previous model was 8 and a half, I put the hand to the face to check the proportions were correct then placed them back on.
I also went an browsed some websites for women of similar shape to the aviator concept. Its a thing i forgot to mention that I'm not doing an 80 year old aviator because I'm trying to follow the concept who is a young female. Anywho images belows;
I also looked at bigger curvier women in case I wanted to go that way with the model. Its something I might do at the end is make her more curvy just for fun, I think it would add more character but at the same time the concept is thin but it can be like a different version :)
Monday, 28 January 2013
Aviator Base & 2nd Years
So its been a while since i updated where my model is at, low poly is done, unwrapping is finished. Total tri count is 8,826. AO's are baked, high poly is baked, base is done. So what is now is going into make the items of clothing look like the materials they are suppose to be. I still have to rig but it shouldn't take very long so all in all i'm not doing too bad with timing, its all about just getting stuck in and doing the last parts to really sell the character.
On a side note any second years that read my blog here are a few websites you can search pictures for your inspiration talk. Search them and type in the things you want to look at and I'm sure you will find some awesome stuff. You should be inspired by the world around you and what people create, if you haven't started an inspiration folder, do it now. It will become your library of awesome you go to feed your brain when it's hungry for ideas;
http://ffffound.com/
http://www.opacity.us
http://exhibition-ism.com/
http://www.photovault.com/
http://www.thisiscolossal.com/
http://vi.sualize.us/
http://pinterest.com
http://weheartit.com/
Saturday, 19 January 2013
Aviator Update
So update, I'm onto Zbrushing and fighting my computer stupid pen pressure but you can see better the stylized proportions of the character. Below are some of the materials i will have on the character and some ref for folds and colour. So i want to be quite subtle with the fold and detail but i will experiment with a few brush strokes and stuff since the model will be stylized it makes sense for the textures to be. I might do a blog on other peoples characters and how they have done their characters in Zbrush. Okay that is all without dragging it out into a rant.
Wednesday, 16 January 2013
Aviators
Right so the next project is the aviator and I spent a few days building a mesh for Zbrush. I wanted to stay close to the original design but exaggerate quality's like bigger hands, longer legs, bouffant of hair...etc. Taking a lot of inspiration from dishonoured because of its awesome stylization. So yeah I have been dragging this out because I don't have a pen tablet at the minute.
Sunday, 13 January 2013
Rooftop Video & Screenshots
Long time no see blog, I have missed you and now I have to do a major update :D
Sound does not belong to me, I can only do so much, creating music isn't one of them.
Okay so thoughts, Sammy hates texturing and so didn't do it for a long time, this is something I will change during FMP, I will model, unwrap and texture and asset before moving onto the next one. That way I can get to do the part I enjoy as well as keep me focused and on track.
So what annoys me most? Its the super clean floor and no dynamic shadows, so that is definitely something I will play with but as with UDK nothing is as simple as one tick box. But what things did Heather tell me to do at assessment and did I do it? Well it was a blank canvas and she told me to get it textured so that's done. She also said that I had a really boring area in my level which I placed a big sign :D.
Here are some screenshots too, my level is a weird one because it would benefit from a portrait screenshot but obviously I can't do that, and nope can't take two and merge it in photoshop because everything is rotating it would be almost impossible to time up.
Problems encountered...do you have to ask? KISMET, okay I like kismet its not bad and i thought the Ferris wheel was going to be a doddle. Oh how I was wrong Adding separate lights was the biggest regret of my scene, but i couldn't do it in groups because that would have went over budget Now I spent literally hours and hours researching the best way to do this and their seemed to be a way but you had to learn to code. I my fine sirs am not a coder and so i searched and searched and found a method of attaching the light to an existing track, that way i wouldn't have to manually move every light around in a circle. So I thought you could attach multiple lights to a node....nope it wasn't happening. And so i had to do it the long way, now this isn't what they would do in industry but I wouldn't be doing this in a job so be prepared for my image of death.
I actually exceeded kismet limit...i didn't think this was possible but even with that error message everything seems to still move okay. now I couldn't make an image big enough for you to actuallly see what's happening, thats as far as i can zoom out and i still had to use 3 screenshots to get that image. I hope you appreciate the hours I spend connecting and lining up nodes, no joke like never mind hours lets calculate in days.
Nevertheless it works and thats all that matters :D
Nevertheless it works and thats all that matters :D
Above is the material i used for my assets to give them that stylized look. If you haven't guessed already I love stylized stuff and I take any excuse to slap on an awesome shader. Will my aviator be stylized? Of course because that's how i roll.
Okay I'll leave it at that, time to upload and update to other places now :D Love you blog, i have missed our talks :)
Subscribe to:
Comments (Atom)


